Remote access
Warning
Due to the current spread of Coronavirus, the College is transitioning to remote running in order to maintain physical presence on campus at a minimum. As a consequence, we expect a surge in the use of remote connections to our machines and as such we want to provide a few general indications
If you are setting up a new connection, please set it up to use either kirchhoff or lorentz as they are more lightly used.
Please, refrain from working on one of the bastions and prefer setting up ssh netcat mode to connect to your workstation.
Note that
/homeand/datadirectories are shared across different machines, whereas/workspaceis local to each machine.Machines occasionally crash and become impossible to reach remotely. If this happens, please do the following:
- Inform Andy Thomas about this. Please include the hostname of the machine and its physical location.
- Note that work which does not require
/workspacecan be performed on any machine in the cluster.
If you are having any problem setting up remote access, please get in contact with Andy Thomas.
SSH access
We are quite strict on security as we (and other groups in the College) have had problems with hackers[1] in the past. Please read Security before proceeding. Everyone is expected to have a degree of familiarity with security, ssh and public key authentication so that informed decisions can be made.
You may only login interactively to workstations using your password. Remote access to any workstation is only allowed via SSH and authentication must be performed using public key authentication.
Note
The commands below assume you are using a *nix environment (e.g. Linux, Mac OS or cygwin). Patches to the documentation which provide similar instructions for Windows are welcome.
SSH access from outside the cluster
You can generate a key pair, consisting of a public key and a private key, by running (on the computer from which you wish to access the CMTH/TYC cluster):
$ ssh-keygen
Important
- Do not use an empty passphrase.
- There is no need to generate a key with a different name for each different service you want to use. If you have previously generated a key pair for some other system, it’s fine, and much simpler, to use this for multiple systems.
In order to use the key to ssh into the cluster, you must first add the public key (ie the part with the .pub suffix) to your ~/.ssh/authorized_keys file on your CMTH/TYC account. If necessary, create the ~/.ssh/authorized_keys file. Ensure that you add the key on one line with the key itself as a single word. Note that you will need to copy the public key from the remote machine to the CMTH/TYC cluster before you can add it to the ~/.ssh/authorized_keys file.
Warning
Due to the current spread of Coronavirus, please send your public key by email to Andy Thomas along with your username. I will let you know once the key is in place.
Important
Whilst it is safe to publicise the public half of a key (hence the name), you must keep the private half secret. Emailing yourself the public key is perfectly acceptable (and is one of the easiest ways to get external keys into your authorized_keys list). Do not email or copy around a private key. Instead, create a key pair for each machine you use.
Finally, the SSH protocol requires that only you have access to your .ssh keys. Do this by running
$ chmod -R go= ~/.ssh
You need to do this both on your CMTH/TYC account and on the external machine you wish to use to connect to the CMTH/TYC cluster.
You will now be able to ssh into the cluster from the external machine, e.g.
$ ssh jspencer@bose.cmth.ph.ic.ac.uk
ssh will then prompt you for your passphrase. If you have set everything up correctly, you will then be logged into the CMTH/TYC cluster (in this example to the workstation called bose).
To further aid security, only three computers within the cluster accept ssh connections from outside the cmth.ph.ic.ac.uk subdomain. They are bose.cmth.ph.ic.ac.uk, kirchhoff.cmth.ph.ic.ac.uk and lorentz.cmth.ph.ic.ac.uk. All other workstations can only be remotely accessed from other cluster machines. Thus to ssh into your workstation from outside the cluster, you must first ssh into bose, kirchhoff or lorentz and then ssh into your workstation.
Windows
If you want to remotely access the cluster from a Windows client there are the following possible routes:
- Microsoft has recently released an OpenSSH client (and server) for Windows 10. More information can be found on Microsoft Docs.
- A Linux environment can be obtained in Windows 10 thanks to the Windows subsistem for linux. This includes an OpenSSH client.
- PuTTY is an open source SSH client for the Windows platform.
- MobaXterm is a (free for personal use) X11 server and tabbed SSH client for Windows.
SSH access between workstations in the cluster
SSH between machines in the cluster also requires public key authentication. The steps involved are similar to those above but simpler because all workstations share the same home directory.
Log into any workstation in the cluster using your username as password, as normal.
Create a public/private key pair:
$ ssh-keygen
Again, do not use an empty passphrase.
Add your public key to your ~/.ssh/authorized_keys file on the CMTH/TYC cluster. Since all workstations on the cluster see the same home directory, you do not need to copy the keys from one machine to another.
Ensure the permissions on your ~/.ssh directory are sufficiently secure:
$ chmod -R go= ~/.ssh
You will now be able to ssh between workstations within the cluster, for example:
$ ssh burger
As you are already logged into the CMTH/TYC cluster, you do not need to specify your username and the .cmth.ph.ic.ac.uk subdomain explicitly.
ssh-agent can be used to hold private keys and avoid having to enter the passphrase every time. Most desktop environments (including GNOME, XFCE and OS X) run ssh-agent (or a program providing an implement of ssh-agent) in the background automatically (if not, see the ssh-agent man page on how to run it). Running an ssh command often causes a key to be added to the agent (so that the passphrase need only be entered once). If this is not the case, a key can be added manually using:
$ ssh-add ~/.ssh/key_name
where ~/.ssh/key_name is the file containing the relevant private key.
Note
Xfce now defaults to using gpg-agent to handle ssh keys. This may not be most suitable for some users/workflows. See Xfce Tips for (a little) more information and external links providing extensive discussion on this.
Tips
You can save yourself a lot of typing by using ~/.ssh/config. For instance:
$ cat ~/.ssh/config
host bose
    hostname bose.cmth.ph.ic.ac.uk
    user jspencer
enables me to do
$ ssh bose
instead of
$ ssh jspencer@bose.cmth.ph.ic.ac.uk
Many options are possible—see the ssh_config manpage for more details. An important option is ProxyCommand—see ssh netcat mode for how to use this to connect to a workstation other via bose/kirchhoff/lorentz in a single command.
If you find yourself using ssh a lot, you might like to investigate screen.
You cannot, by default, use X (i.e. graphical) applications remotely. In order to do so, you must ‘forward X’ over the ssh connection. This is done by passing the -X option to ssh, e.g.
$ ssh -X jspencer@bose.cmth.ph.ic.ac.uk
after which X applications can be run on bose (in this example) with the graphical interface appearing on the local machine. This requires X to be installed on the local machine; all (common) linux distributions run X. OS X can run an X server if XQuartz is installed (OS X may prompt you to install XQuartz the first time an X Windowns entry is run from the Utilities section of the Applications directory). Windows users must install a version of X such as Xming.
Forwarding X applications over ssh can be very slow, particularly from outside the College network. If accessing graphical applications remotely is really necessary, then VNC is extremely useful.
OSX comes with OpenSSH. Windows users can use PuTTY and PuTTYgen. Instructions on how to set up ssh access using PuTTY would be gratefully received!
If you ssh between machines in the cluster frequently, then you may like to have tab completion enabled for the hostnames. This no longer happens automatically now the hostnames are hashes in .ssh/known_hosts. However, you can explicitly add all workstation hostnames to the ssh completion function using the following command (best placed in ~/.bashrc):
$ complete -W "$(cat /common/etc/cmth_clients)" -F _ssh ssh
Further machines can be added between quotes. (/common/etc/cmth_clients is a fairly reliable list of current workstation names in the cluster.)
ssh netcat mode
OpenSSH 5.4 introduced a very nice feature: a “netcat” mode, which allows one to connect to a machine via another machine in a single command. This is most easily done using ~/.ssh/config. For example:
host bose
    user jspencer
    hostname bose.cmth.ph.ic.ac.uk

host kirchhoff
    user jspencer
    hostname kirchhoff.cmth.ph.ic.ac.uk

host tycpc31
    user jspencer
    proxycommand ssh -W %h:%p kirchhoff # could equally use bose
makes it possible for me to connect to tycpc31 in a single command:
$ ssh tycpc31
Naturally tycpc31 and jspencer should be replaced with your workstation and username respectively.
If your version of ssh does not have this feature, then you can use the netcat program on the ssh bastion host (ie bose and kirchhoff) in the entry for the desired workstation e.g.:
host tycpc31
    user jspencer
    proxycommand ssh bose exec nc %h %p
which essentially does the same as the -W option to ssh.
If netcat isn’t installed on the ssh bastion host (note that it is installed on bose and kirchhoff), then you can use ssh tunnelling without netcat to accomplish similar things.
VNC
VNC is a way of remotely accessing a graphical desktop and is substantially faster than forwarding X applications directly over ssh. As security considerations mean that unencrypted remote connections are not allowed, VNC connections must be secured using ssh.
VNC works in two parts: one program (the VNC server) runs on the remote computer (in this case, a cluster workstation) whilst another program (the VNC client) runs on the local machine. The instructions below are for Linux and OSX machines; as ever, Windows instructions would be welcomed!
The VNC server can be run on kirchhoff or bose and then can be accessed via an ssh connection to kirchhoff/bose. However, this would place an excessive load on these workstations if everyone did so. Instead, it is better to run the VNC server on your own workstation and use ssh port-forwarding to connect from your local computer to your workstation via bose or kirchhoff.
First, start the VNC server running on your workstation:
$ vncserver -geometry wxh
where w is the width and h is the height (in pixels) of the VNC screen you wish to have. You will be told the server number created.
The VNC server using display X (where X is an integer and printed out when vncserver is started) is available at port 5900+X. Connecting to VNC must be done via ssh. The first task is to forward the port on the CMTH/TYC workstation over ssh to a local port (ie on the machine outside the cluster), following which the vnc session can be securely accessed using that port. This is very easy if ~/.ssh/config is set up to allow connection to the desired cluster workstation in a single command (see ssh netcat mode). For example, if the VNC server is running on workstation:2 (ie display 2, so port 5902, on workstation):
$ ssh -Nfg -L4901:localhost:5902 workstation
$ vinagre localhost:4901
4901 is an arbitrarily chosen port number. Older versions of Linux or KDE-based distributions might not have vinagre—try vncviewer or the KDE equivalent instead. OSX users should use the command ‘open vnc://127.0.0.1:4901’ instead of the vinagre command. If netcat is not an option, then port forwarding can be used to accomplished the same thing (see ssh tunnelling without netcat).
X2Go
X2Go enables you to access a graphical desktop of a computer over a low bandwidth (or high bandwidth) connection.
With X2Go, you mainly access Linux computers. The Linux computer you are accessing is the X2Go Server. (There are ways to connect to a Windows computer as well; some of them are only available with the Linux X2Go Client.)
You can connect from a computer running Linux, Windows or Mac OS X. This computer is the X2Go Client.
Multiple users/clients can access a single X2Go Server at the same time, with each user/client having an individual Desktop session by default.
– Introduction taken from the New to X2Go page.
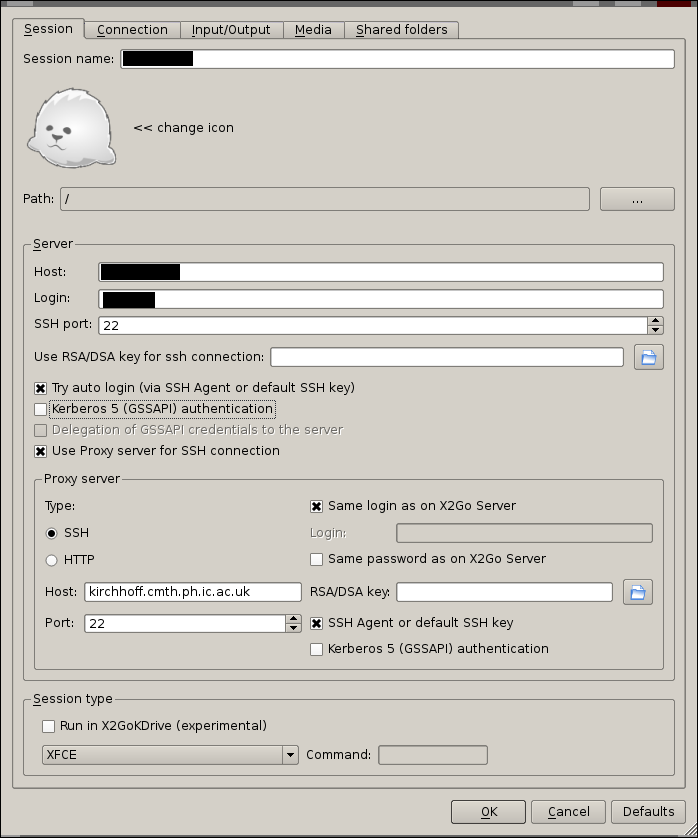
Connection parameters
Note
Since X2Go relies on SSH to establish the connection, you should first set up your SSH key as described in SSH access
The parameters needed to use X2Go are very similar to what is used for normal SSH access, including settings for ssh netcat mode. You can copy the parameters from the following screenshot, while adding your username in the Login field and the name of your workstation in the Host field.
Copying files to/from the cluster
As bose and kirchhoff are accessible from outside the cluster and the home directories are mounted from the NFS server on all workstations, copying to/from a home directory can be accomplished simply by using bose or kirchhoff. For example:
remote-computer $ scp jspencer@kirchhoff.cmth.ph.ic.ac.uk:/home/jspencer/path/to/file file
remote-computer $ scp file jspencer@bose.cmth.ph.ic.ac.uk:/home/jspencer/path/to/file
For more options, please see the scp man page.
It is slightly trickier to copy files to/from the workspace, as /workspace is local (i.e. different) to each workstation. One can get around this by first using scp to copy files to /workspace on bose or kirchhoff and then a second scp to copy to the remote machine (or in reverse order to copy files onto /workspace from outside the cluster).
However, a faster and more convenient way is to use ssh netcat mode. Assuming workstation is a computer name which has been set up to be accessed via bose or kirchhoff in ~/.ssh/config, then
$ scp local-file workstation:/workspace/jspencer/file
$ scp workstation:/workspace/jspencer/file local-file
on a machine outside the cluster copies files to/from the desired workstation without having to copy the files in two stages via bose/kirchhoff.
If netcat is not an option, then port forwarding can be used to accomplished the same thing (see ssh tunnelling without netcat).
Web access
There are many websites (eg internal web pages, online journals) which only allow access from machines on the Imperial College network. You use the College’s HTTP proxy server to get around this restriction when working on a machine outside the College. Alternatively, you can use the College’s VPN service, which would route all the internet traffic from your remote machine through the college network.
As an alternative, if you do not yet have an Imperial College account but have an account on the CMTH cluster, you can use an SSH SOCKS proxy. Assuming you have external access to the CMTH network via ssh (as detailed above) then:
Open up an ssh connection to a workstation which accepts external ssh connections (i.e. bose or kirchhoff) and forward to a local port:
$ ssh -NfD 8080 username@kirchhoff.cmth.ph.ic.ac.uk(I believe you can do something similar with PuTTY on Windows.)
Tell your computer to use the SOCKS proxy provided by the ssh connection. If your browser is Firefox, then you can do this by going to Tools->Options->Advanced->Network->Settings. Select ‘Manual proxy configuration’ and enter for the SOCKS host ‘localhost’ and enter 8080 for the port.
The relevant settings on OSX are under System Preferences->Network->Advanced->Proxy and can be configured in a similar fashion.
An alternative to using SOCKS forwarding is to use sshuttle, which forwards over SSH and ‘’works as a poor man’s VPN’‘.
ssh tunnelling without netcat
If you are trying to create a tunnel through a computer which doesn’t have netcat and you’re using an old version of ssh without netcat support, then you’ll have to use ssh port-forwarding.
For example, the following commands (again, best in a script) will
user=jspencer
bastion=???.cmth.ph.ic.ac.uk
server=tycpc19.cmth.ph.ic.ac.uk
vncserver=1

# ssh tunnel through bastion (bose/kirchhoff)
ssh -Nfg -L60022:$server:22 -l $user $bastion

# ssh tunnel bastion->workstation ($server)
# vnc uses port number 5900+i (where i is the vncserver number).
let server_port=5900+$vncserver
ssh -Nfg '-oNoHostAuthenticationForLocalhost=yes'  -L4901:$server:$server_port -p 60022 -l $user localhost

# open VNC.
vinagre localhost:4901 &
Obviously you will need to change the username, set bastion to be either bose.cmth.ph.ic.ac.uk or kirchhoff.cmth.ph.ic.ac.uk, change the workstation name from tycpc19 and (possibly) change the VNC server number. Older versions of Linux or KDE-based distributions might not have vinagre—try vncviewer or the KDE equivalent instead. OSX users should use the command ‘open vnc://127.0.0.1:4901’ instead of the vinagre command.
Similarly for copying files:
remote-compute $ ssh -Nfg -l jspencer -L20000:lorentz.cmth.ph.ic.ac.uk:22 bose.cmth.ph.ic.ac.uk
Files can now be copied to/from the CMTH workstation by using localhost:
remote-compute $ scp -P20000 jspencer@localhost:/workspace/jspencer/file local-file
remote-compute $ scp -P20000 local-file jspencer@localhost:/workspace/jspencer/file
Footnotes
| [1] | Hackers in the bad sense rather than the good sense of the word. |